Sooner or later you will want, or perhaps need, to replace the aerial on your SJ.
A replacement "Side Mount" aerial is easily available from most good motor factors or aftermarket accessory parts shops.
Replacement is fairly simple, although there are a few things to watch out for.
Tools and equipment ...
New aerial
Philips / Star screwdriver
Insulation tape
wire cutters
Small flat screwdriver
Soldering iron
Solder
Long nose pliers
Twine or nylon string
Cable ties
Removing the old Aerial ...
Begin by removing the flat dash cover beneath the steering column. Unplug the aerial cable from the radio, and cut it off, leaving about an inch of cable still attached to the connector.
Free the aerial cable up to the point where it enters the bulkhead. Now you will need a piece of twine, or string, to use as a pull-cable. Tape the end of the old aerial cable to the pull-cable (about 5cm).
The next step is to remove the old aerial on the outside of the Suzuki SJ. Once the fitting has been unscrewed, pull the cable gently through until the pull-cable appears. We will be using this pull-cable later, to pull the new aerial cable back through into the cab.
Before we fit the new aerial we need to do a bit of preparation work on the new cable.
Preparing the new cable ...

If you remember, one of the first things we did was to cut off the old connector. This was done because it will not fit through the holes in the bulkhead leading to the windscreen.
Logic dictates that if the old one wouldn't fit through the bulkhead and windscreen, then neither will the new one. With the new aerial, if we cut off the connector we will not be able to reconnect it later on.
What we need to do is to carefully remove it so we can re-fit it to the end of the cable again later. Pry off the top cover, and then using the small flat screwdriver, pry up the crimped lugs over the outer sheath. Disassemble the rest of the connector using the soldering iron to remove the centre core.
It does not matter if the centre core of the cable breaks at this stage as we will prepare the cable for the new connector later on. Cut the old aerial cable loose from the pull-cable, and secure the new cable to the pull-cable on the outside of the body.
Fitting the new aerial ...
Now it's time to gently pull th enew cable though into the cab. Feed the cable from the outside while pulling gently on the pull-cable inside the cab. Once you have the new cable inside the cab, screw the base of the aerial onto the windscreen frame and fit the upper aerial support.
Make sure the aerial cable is long enough to reach the radio via your chosen route, and then move onto the next step, which involves refitting the connector removed earlier.
Fitting the connector ...
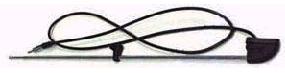
Take the connector you removed earlier. Using a soldering iron, heat up the centre pin and remove any solder or wire that may be trapped inside. Strip the cable as per the diagram on the right, and solder the thin centre wire of the cable to the centre pin. Fold the wires of the outer sheath back over the cable, making sure none of them touch the inner core, and crimp the connector back in place. Refit the cover, and the connector is back on the cable.
Run the cable along the bottom of the dash frame, using the cable ties to hold it in place. Do not overtighten the cable ties or the cable can be damaged. Plug the connector into the back of the radio, and replace the flat dash cover beneath the steering column.


Before

After


![0610_4wd_01z+suzuki_samurai+group_of_suzukis[1274].jpg](/images/gallery/favourites/0610_4wd_01z+suzuki_samurai+group_of_suzukis[1274].jpg)


![fenderfrt6_SJ-1[376].jpg](/images/gallery/favourites/fenderfrt6_SJ-1[376].jpg)