Vitara pick up project

Got an vehicle build underway? post up pictures and tell us all how its going!

Builds threads only please.
User avatar
plugspanner
Engaged 4wd low
Engaged 4wd low
Posts: 179
Joined: Tue Nov 20, 2012 4:35 pm
Location: somerset
Contact:

Vitara pick up project

Post by plugspanner » Sun Dec 23, 2012 4:02 pm

started my vitara pick up project in earnest yesterday and decided to put on the 3in calmini lift kit on the front first.
standard suspension:-
Image
now with the lift kit:-
Image
Image
Image
i am surprised just how much higher it is, the standard wheels look far too small now.
i also did not realise just how much the front wheels now point inwards, i will tackle that job tomorow.
more pics as and when i get these jobs done.
thanks for looking
shaun

User avatar
Darrell
Suzuki, will you marry me?
Posts: 2989
Joined: Wed Feb 23, 2011 7:54 pm
Location: south oxfordshire
Contact:

Re: vitara pick up project part 1, the 3in front suspension

Post by Darrell » Sun Dec 23, 2012 4:17 pm

That's a hell of a difference. You may need a pair of these http://www.bits4vits.co.uk/store/vitara ... od_22.html

Hope the rest goes well :thumbup:
2005-GV 1600se, "Hell" What do I know!

User avatar
dazerede
Suzuki, will you marry me?
Posts: 2141
Joined: Fri Sep 30, 2011 10:23 pm
Location: cornwall callington

Re: vitara pick up project part 1, the 3in front suspension

Post by dazerede » Sun Dec 23, 2012 4:32 pm

Hell that is a big difference some wheel spaces and big ass wheels to finish it off
Suzuki Sj 410 Jap Built
Recaro Seats Fitted
Landini Blue Colour
Full rollcage and winch bumper
1.6 8v vitara lump with su carb
4” calmini lift kit :)
235/75/15 insa turbo special tracks
99.9% Rust Free
BUILT NOT BOUGHT

User avatar
plugspanner
Engaged 4wd low
Engaged 4wd low
Posts: 179
Joined: Tue Nov 20, 2012 4:35 pm
Location: somerset
Contact:

vitara pick up project part 2, the 3in rear suspension

Post by plugspanner » Sat Dec 29, 2012 4:52 pm

i had planned to get the front and rear suspension fitted over xmas and so far i am on shedule,
before:-
Image
and now the rear has been fitted:-
Image
now it looks like this:-
Image
the hardest part was a siezed bolt on the front lower ball joint, i had to drill it out, and the taking off of the rear shocks, as the little end at the top would not be held by anything so i had to resort to the grinder to cut the nut off.
i was quite surprised how almost all of the bolts and nuts were not siezed, but i made sure i put grease on them when i put them back together.
just a few odd jobs underneath, it looks like i need the camber bolts as well, and things like the odd bracket for the handbrake cable as one had broken before i got to it, then i can look at a bumper for the rear, any suggestions for a replacement, or will i have to make one? and i want a front winch bumper.
the arches are now as high as my std hilux ones.
next, trying the bigger wheels and tyres!
thanks
shaun

vitara_mad
Engaged 4wd low
Engaged 4wd low
Posts: 135
Joined: Thu Sep 15, 2011 10:05 pm
Location: dronfield , derbyshire

Re: vitara pick up project part 2, the 3in rear suspension

Post by vitara_mad » Sat Dec 29, 2012 6:06 pm

looking good :doublethumbs:

the pin mount on top of rear shocks are always a pain in the but i don't even bother trying to undo them on standard shock anymore just get the grinder on them

not sure who does the rear bumpers for vits anymore if anyone maybe rhinorays but best way is making your own you can have it exactly how you want it then

User avatar
plugspanner
Engaged 4wd low
Engaged 4wd low
Posts: 179
Joined: Tue Nov 20, 2012 4:35 pm
Location: somerset
Contact:

vitara pick up project part 4, the messy and fidly job done

Post by plugspanner » Fri Jan 04, 2013 5:40 pm

since the weather has been quite mild i decided to extend the xmas work load and get some of those other essential jobs done.
both brake discs were very thin with quite a lip on them so they were changed, quite cheap to buy as well.
as the hand brake cable bracket on one side snapped off on the lift job and the calmini ones have a mounting hole those were the next job, using a small angle bracket and some of those 'P' clips with the rubber insert, the drivers side had obviously been rubbing the tyre for a while as it was worn to the metal casing, but the cable was actualy quite a new fitting but the rubber gromets underneath were not put back in properly so they were fitted correctly.
then the really messy job of the oil and filter change.
the underside of the engine/gearbox was covered in oil so it must have had a small leak for a few years and the oil was very black indeed.
also changed the air filter as well.
i have still to change the distributer oil seals and the cam cover gasket.
i have also got hold of an 8x3 sheet of checker plate from the scrappy, again quite cheap, and this will be used to make a front diff/gearbox/transfer box guard in one go using the front suspension mounting bolts & the 2 cross members farther back.
progress has been quite good so far and was actulay quite enjoyable as an exercise in how to mod a vitara from scratch.
i am glad i got an unmolested one now rather than someone elses cast off.
pretty soon it will be ready for the mot, which i may do before the paint job and pick up conversion.
sorry no pics of the recent work but will post some on part 4.
thanks
shaun

User avatar
plugspanner
Engaged 4wd low
Engaged 4wd low
Posts: 179
Joined: Tue Nov 20, 2012 4:35 pm
Location: somerset
Contact:

vitara pick up project part 5, the underbody skid plate

Post by plugspanner » Mon Jan 07, 2013 1:18 pm

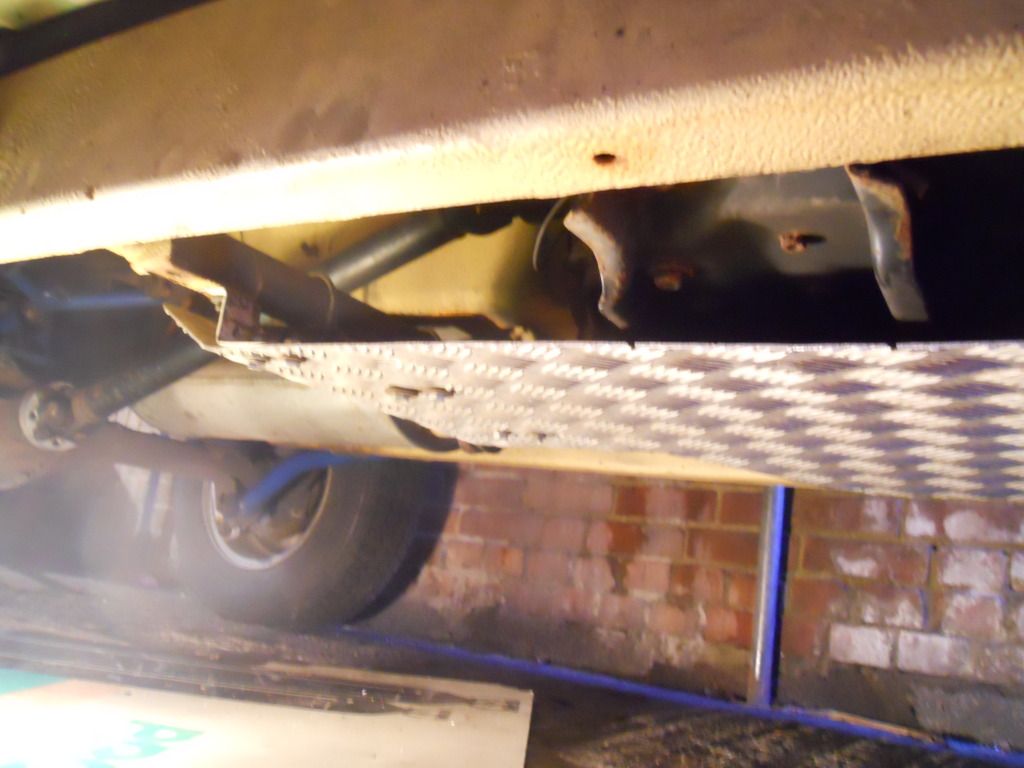
after getting the messy oil change out of the way it was time to sort out some underbody protection.
i have seen a few skid plates on ebay and a few of the suzuki parts specialists but as this is a bargain budget build and my engineering skills are not too bad i decided to make one myself.
i have looked at quite a few self build skid plates on this and various other forums and thought that it looked fairly easy to do it yourself.
my last trip to the scrap yard with a load of steel odds and ends gave me a chance to see what they had in terms of ally plates and i managed to do a part exchange and got myself a 7ft x 3.5ft sheet of 4mm checker plate for £14, bargain.
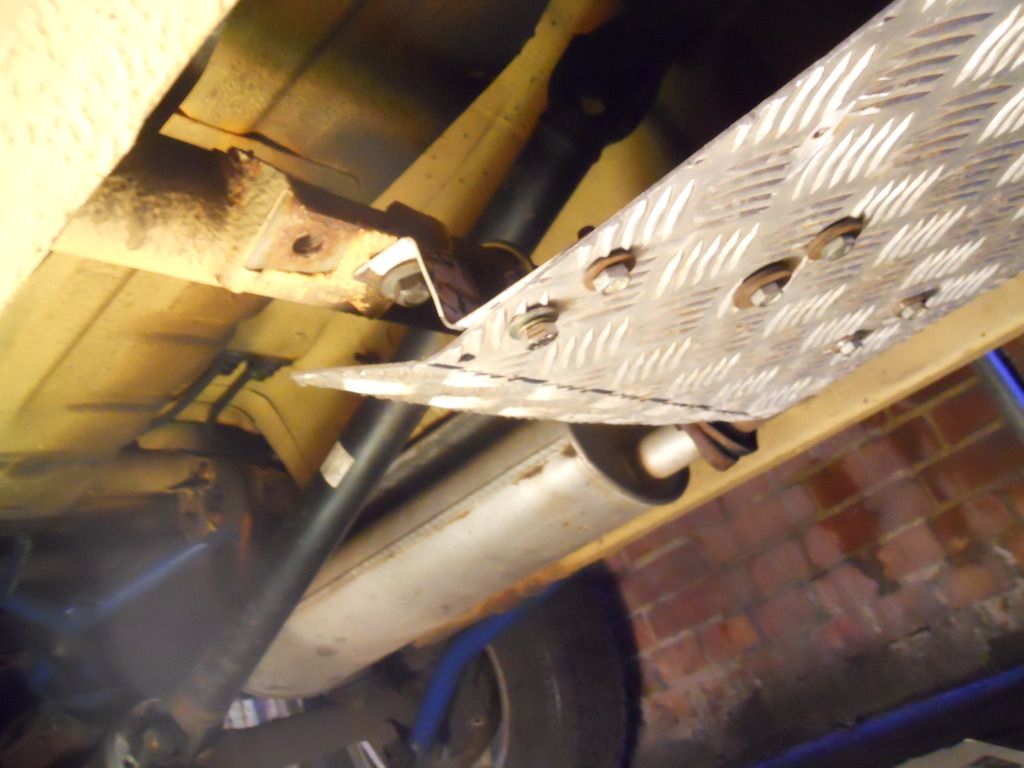
when looking at the underneath of the car a few pre threaded holes were apparent along with the front 2 whishbone bolts, the gearbox cross member ect, i got some 2x2 angle to use between the 2 front wishbone bolts and after welding 3 nuts to the angle i can bolt the plate to that, it also gives the gap between the 2 front wishbones a bit of strength, so after a few measurements and fidiling around a plan and shape was formed and here is the result:-
Image
Image
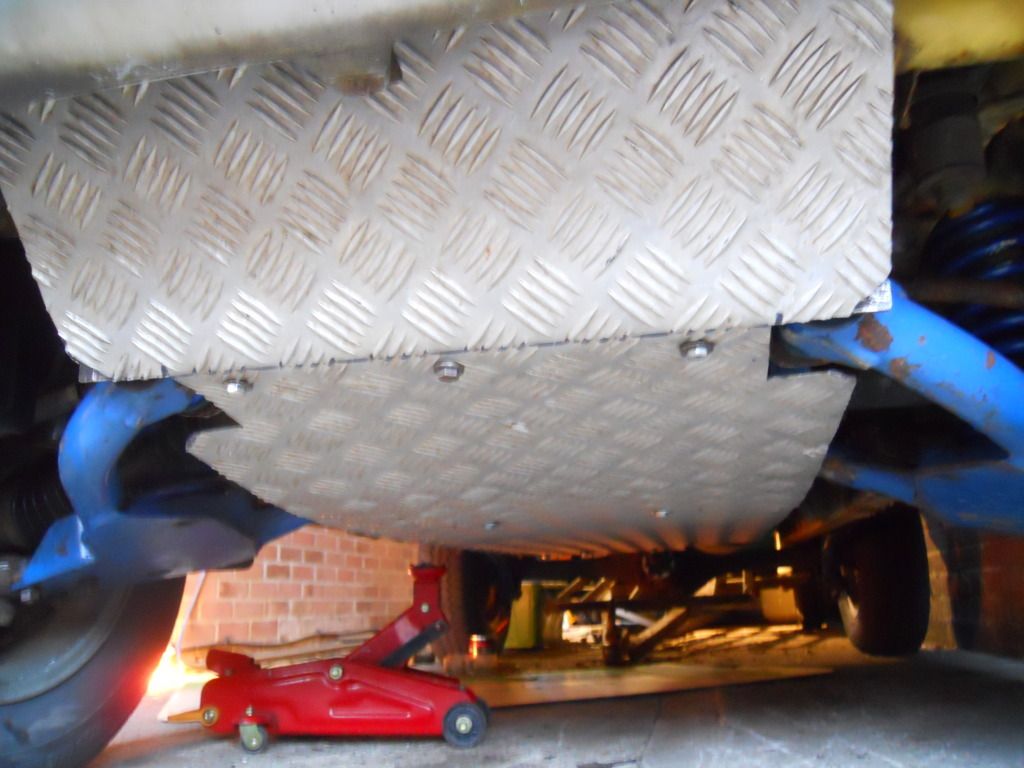
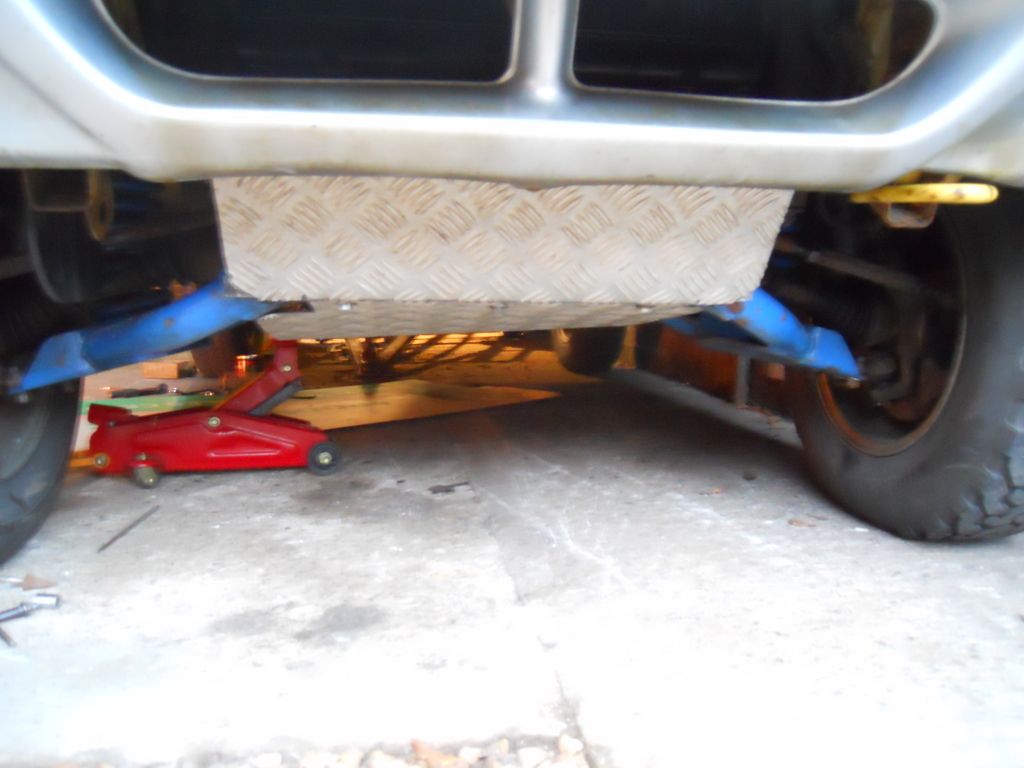
i have still to fix the front plate to the tube of the front cross member, still deciding how, but it now goes all the way to the start of the rear exhaust box.
ihave also used some self adhesive rubber strips where the gearbox cross member touches the plate and have used some self adhesive rubber wahsers between the plate and the mounting holes and brackets ect, i just hope it does not vibrate too much.
Image
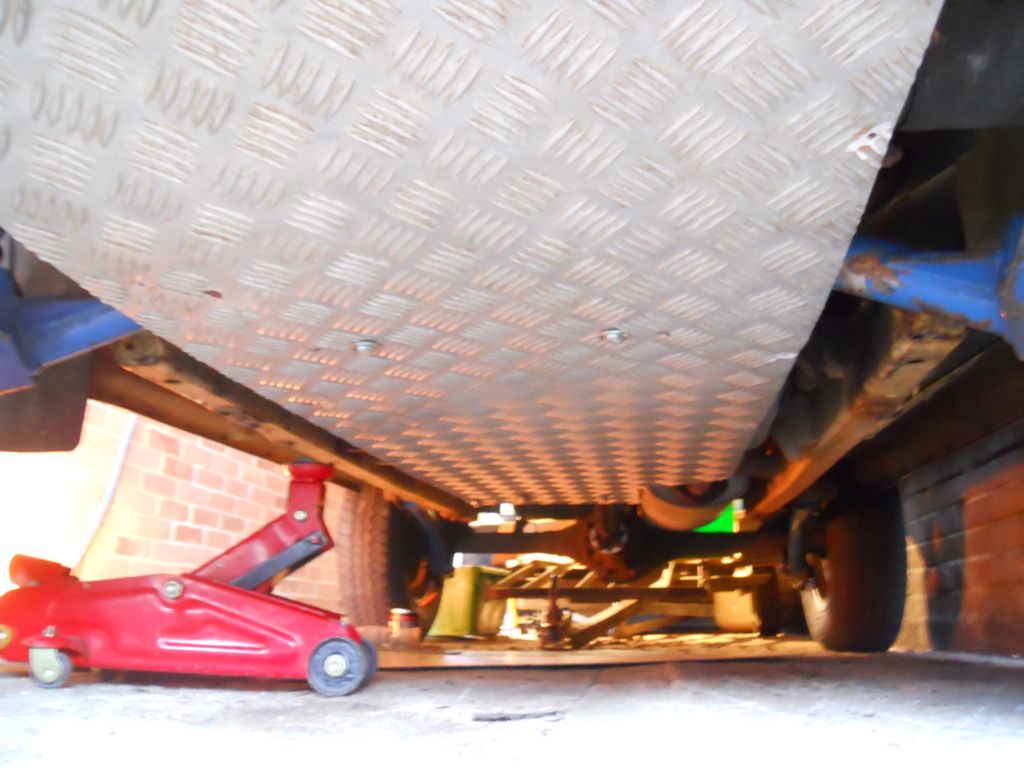
as the cross member in front of the rear ex box is round i used 2x 51mm exhaust clamps and some bumper brackets from a 1959 morris van i happen to have lying around along with an 'L' bracket near the rhs chassis rail which is also pre thereaded, (not sure what is mounted there, nothing on my car), and another 'L' bracket on one of the exhasut pipe mounts on the gearbox cross member.
Image
i kinked up the rear of the plate so as not to get traped if i need to reverse,
Image
Image
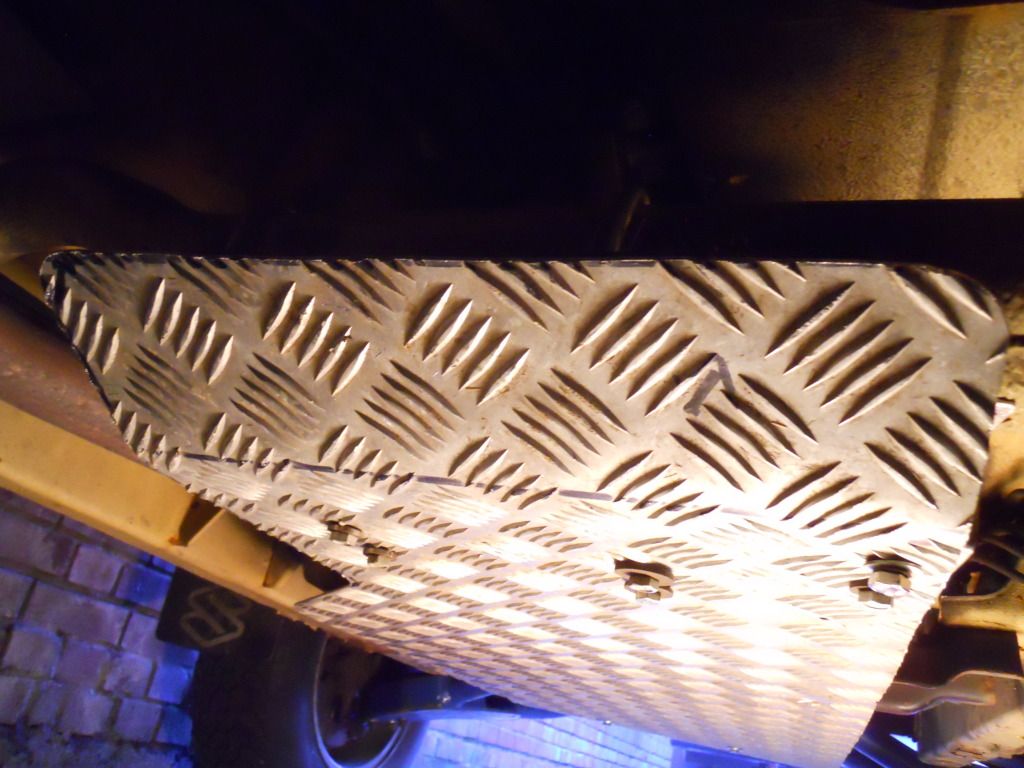
all in all i was really please with the result, it did not take too long once i had a plan, the main time taken was having to constantly take it off and put it back on the check and drill holes ect.
total cost was about £20 inc some fine thread bolts from bits4vits and about 4 hours work.
so i can now traverse those rocks and other sticky up thinks without fear of smashing my front diff, gear box, transfer box and ex cat.
thanks for looking.
shaun

User avatar
ScottieJ
The Boss
The Boss
Posts: 11609
Joined: Tue Apr 15, 2008 12:13 pm
Location: Chippenham, wiltshire

Re: Vitara pick up project

Post by ScottieJ » Mon Jan 07, 2013 4:13 pm

Coming on really Nice Shaun, the underbody skid looks good! should help you slid over stuff better and give you a bit of protection, Just watch out though it might fill up with quite a bit of mud so would be worth dropping and cleaning every now and again :thumbup:

Hope you done mind but I've compiled your build threads into one single build thread, I think it's better this way so we can all follow the progress from start to finish all in one place :thumbup: so post up any future updates here instead of starting a new topic each time ;)
Zuki Build

Steady as she goes!

vitara_mad
Engaged 4wd low
Engaged 4wd low
Posts: 135
Joined: Thu Sep 15, 2011 10:05 pm
Location: dronfield , derbyshire

Re: Vitara pick up project

Post by vitara_mad » Mon Jan 07, 2013 4:19 pm

looks like a good quality job you done :doublethumbs:

the only thing i would do differant is drill a few holes with a hole saw to help with build up of mud on top of the plate

User avatar
ScottieJ
The Boss
The Boss
Posts: 11609
Joined: Tue Apr 15, 2008 12:13 pm
Location: Chippenham, wiltshire

Re: Vitara pick up project

Post by ScottieJ » Mon Jan 07, 2013 4:45 pm

Where I kind've see where you are coming from Vitara mad I can also imagine holes having a sort of cheese grater effect on the mud so more mud might actually end up on top of it with the holes there??
Zuki Build

Steady as she goes!

Post Reply