Zuk on 38's

Got an vehicle build underway? post up pictures and tell us all how its going!

Builds threads only please.
User avatar
TanZuk
Engaged 4wd low
Engaged 4wd low
Posts: 234
Joined: Thu Jan 05, 2012 11:17 pm
Location: Pompano Beach, Florida US

Re: Zuk on 38's

Post by TanZuk » Thu Sep 19, 2013 6:51 pm

Finally decided on how to address the 3 weak transfer case mounts. 2 of the 3 just about done, still looking at the last one.

This happened to be one of those jobs that I didn’t want to do since the welding areas were a PITA to do. This is because there was very little room to get your head in with a helmet to see the welds.

Long DS TC Boxed Mount

Image


Image


Image


This is the FT/ PS cut off TC mount. Need to weld the wrap box plates in


Image


Image


Image


The Back PS/TC mount will be wrapped also still working the best way for me.

User avatar
TanZuk
Engaged 4wd low
Engaged 4wd low
Posts: 234
Joined: Thu Jan 05, 2012 11:17 pm
Location: Pompano Beach, Florida US

Re: Zuk on 38's

Post by TanZuk » Thu Sep 19, 2013 6:52 pm

Finished up the modified t-case mounts. Installed the Snatch and t-case, took some measurements for the rear DS. Decided to use High Angle Drivelines to build the DS, Jesse’s recommendations was to go with a 30* all Toy rear shaft which should be here in about 3 weeks.

Going to use this time to start working on the brakes, which will include Subi M/C, v6 Toy calipers up front and the Monte Carlo rear disc conversion.

Will probably go with a t-case e-brake that I will make up myself (so it doesn’t rattle ). Should have an issue bumping it into anything with height of the Rig, but will add some type of skid plate.

Only have the 14 bolt Snatch so I could use the back side for the e-brake brackets. It will end up as a 17 bolt when it is finished.

P/S Frame Mounts

Image


Front View

Image


Rear View

Image

User avatar
TanZuk
Engaged 4wd low
Engaged 4wd low
Posts: 234
Joined: Thu Jan 05, 2012 11:17 pm
Location: Pompano Beach, Florida US

Re: Zuk on 38's

Post by TanZuk » Thu Sep 19, 2013 6:53 pm

Here is a list of things that I have either completed or in the middle of finishing. As usual everything is a tight fit, seems like all the parts just want to be located in the same spot.

Decided to make up my own GM disc brake conversion with all the usual components,
including the caliper brackets.

Working on outboarding the rear shocks.

Making up rear bump stops and frame bumpers.

And yes there will be more ¼” plate added to the outer frame rail for the Ford shock tower and upper frame mount bump stop.


Here are a couple of double flex pics, Needed to do this to check for clearances between the rear shock and tire. Ended up with an 1” of clearance.

Needed to use a couple of cargo straps to get the rear spring to the desired load for the bump stops.


Image


Image

User avatar
TanZuk
Engaged 4wd low
Engaged 4wd low
Posts: 234
Joined: Thu Jan 05, 2012 11:17 pm
Location: Pompano Beach, Florida US

Re: Zuk on 38's

Post by TanZuk » Thu Sep 19, 2013 6:53 pm

Finished up the DS rear outboard shock mount, lower bumpstop with extension, frame bumpstop pad and the rear disk brakes.

Here are the pieces that were made up to complete the task. These pieces were made in double to finish off the PS.


Image


Here is a pic of the lower components. There will be a plate added to the bottom of the pad after the POR50 is painted on the inside.


Image


Pic of the upper components


Image


Side View


Image

User avatar
TanZuk
Engaged 4wd low
Engaged 4wd low
Posts: 234
Joined: Thu Jan 05, 2012 11:17 pm
Location: Pompano Beach, Florida US

Re: Zuk on 38's

Post by TanZuk » Thu Sep 19, 2013 6:54 pm

Finished up welding in the shock and bump stop mounts on the PS. Had an interesting issue that lead to removing one of the fuel tank mounts. This fuel tank mount needed to be notched out around the frame bump stop mount, trimmed and welded back in. This actually took me longer to figure out how to do it then it took to get it done.. Got some POR50 painted on the inside of the upper frame bump stop and welded in the bottom pads.

If you look close you will see a rear driveshaft is mounted. Starting to get closer to getting this thing moving under its own power.

Image

Worked on the Suby master cylinder mod. Ended up going in a different route since the outside dimensions were no where near the same as the Sammy master and the O ring was not usable. Instead of using a bunch of RTV to seal the master I decided to do it like this.

Image


Image


Got some goodies in from lowrange today to start on the brake lines. I will be using the Poly coat hard brake lines.


Image

User avatar
TanZuk
Engaged 4wd low
Engaged 4wd low
Posts: 234
Joined: Thu Jan 05, 2012 11:17 pm
Location: Pompano Beach, Florida US

Re: Zuk on 38's

Post by TanZuk » Thu Sep 19, 2013 6:55 pm

Got all the parts needed to start plumbing the rear brake lines. Really don’t like doing brake lines. Opted to use the NICOPP lines since they are easier to work with and do not corrode.

Here are the tools that were used to double flare and bend the tube. Ended up making a tight tube bender which has worked out well so far.


Image


Decided to use the Sami front braided lines that are DOT approved over the longer lines that were not. This was also much cheaper. The lines were routed around from hitting anything and a clamp was used to secure it from moving. With the hose routed like this there is enough slack to remove the caliper without taking off the brake line.


Image


The union bracket for the Braided to hard line was welded to the under rear portion of the spring perch on both sides.


Image


Finished rear brake line plumbing


Image

User avatar
TanZuk
Engaged 4wd low
Engaged 4wd low
Posts: 234
Joined: Thu Jan 05, 2012 11:17 pm
Location: Pompano Beach, Florida US

Re: Zuk on 38's

Post by TanZuk » Thu Sep 19, 2013 6:55 pm

This build is really starting to drag out. It is getting much closer now to moving under it's own power. Will still need to make a bunch of stuff after that but at least it will be moving.


The steering extension has been welded up. The material in the six shooter arm was made from 8620 forged tool steel. The extension was made out of a block of 8620. The 8620 welding rod ended up being a special order and a minimum order of 5 lbs. This was not such a good thing since there was only going to be 4 rods needed.

There was also a pre-heat needed to 400 degrees before welded to not damaged the integrity of the materials. I also had to send this out to an expert to get this welded up which also was an additional cost.

Here is a couple of pics of the finished extension welded up and mounted. The anti deflection bracket was also finished up and mounted. The pieces were painted with 2 coats of Por50.


Image


Image

Still working on the brake lines and bracketing.


Image


Rear is the GM rear disc conversion, Lower bump stop and rear tire to shock clearance.


Image


Image

User avatar
TanZuk
Engaged 4wd low
Engaged 4wd low
Posts: 234
Joined: Thu Jan 05, 2012 11:17 pm
Location: Pompano Beach, Florida US

Re: Zuk on 38's

Post by TanZuk » Thu Sep 19, 2013 6:56 pm

Here are a couple of pisc of a horseshoe bracket that was made to attach the proportioning valve securely to the master cylinder mounting bolts. Finished off the firewall plumbing from the converted 6 way to 5 way brake line junction to the Subi master cylinder.


Image


Image


Here is a pic of the residual valve plumbed and mounted


Image

User avatar
TanZuk
Engaged 4wd low
Engaged 4wd low
Posts: 234
Joined: Thu Jan 05, 2012 11:17 pm
Location: Pompano Beach, Florida US

Re: Zuk on 38's

Post by TanZuk » Thu Sep 19, 2013 6:57 pm

Bad Gas Solution (Sunoco Premium was being used)

Going to switch to REC90 to eliminate the ethanol issues

Built my motor about 1 ½ years ago and start it up weekly with good gas. Have a very simple gas tank system set up consisting of:

New 2.5 gallon plastic tank
New Fuel pump and fittings
New fuel and return lines
New anus return filter

This worked out well for about 4 months until the fuel pump quit. Decided to use a Napa electric fuel pump this time and have not had any issues.

Been having issues idle issues with the Quad carbs the past 6 months to where it really didn’t want to run well any more. Pulled the carbs down and noticed all the brass jetting was rusty. This surprised me since the carbs were rebuilt and new jets were installed previously.

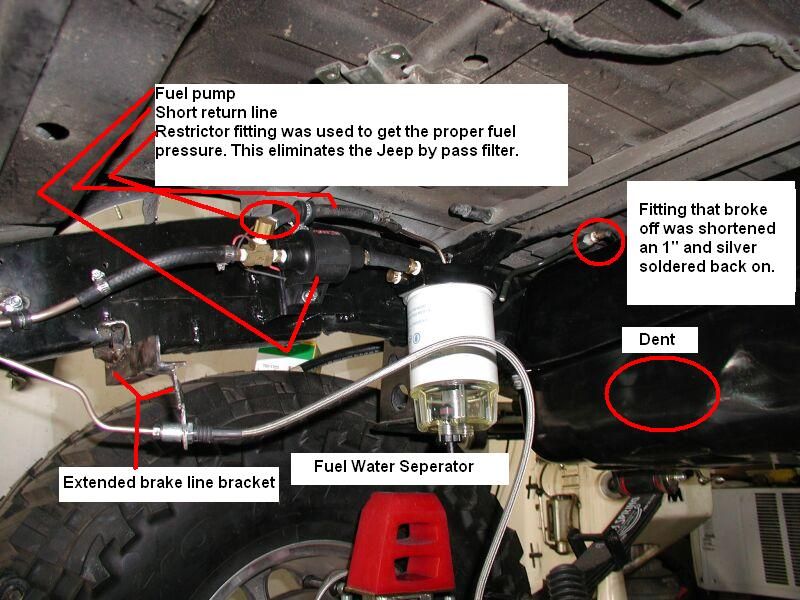
To try and resolve this problem decided to use a fuel water separator, new tank from Rock Auto, new Nicopp 5/16 fuel line and a new Napa fuel pump.

BTW: not sure if I would recommend the Rock Auto gas tank. It was not double boxed and had no packing of any sort to prevent damage. Had 1 corner that was damaged where it mounts and a hand sized dent on the inner panel near the axle. There was also a vacuum line missing going to the plastic bottle by the gas cap. The fuel feed line was also an 1” longer and when the line metal line was screwed back on the fitting had broken loose. Since the fitting broke off this was a good time to shorten that tube an 1” and had it silver soldered back on. There is not a bottom drain either.

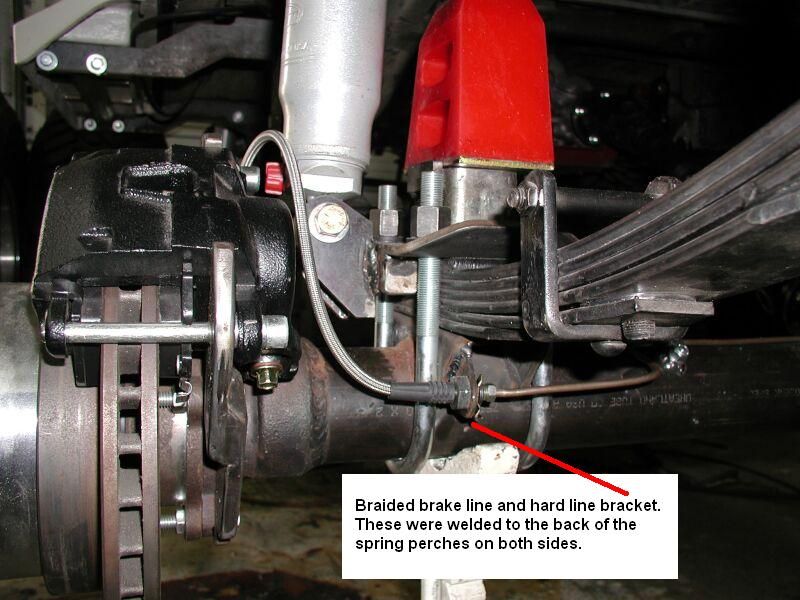
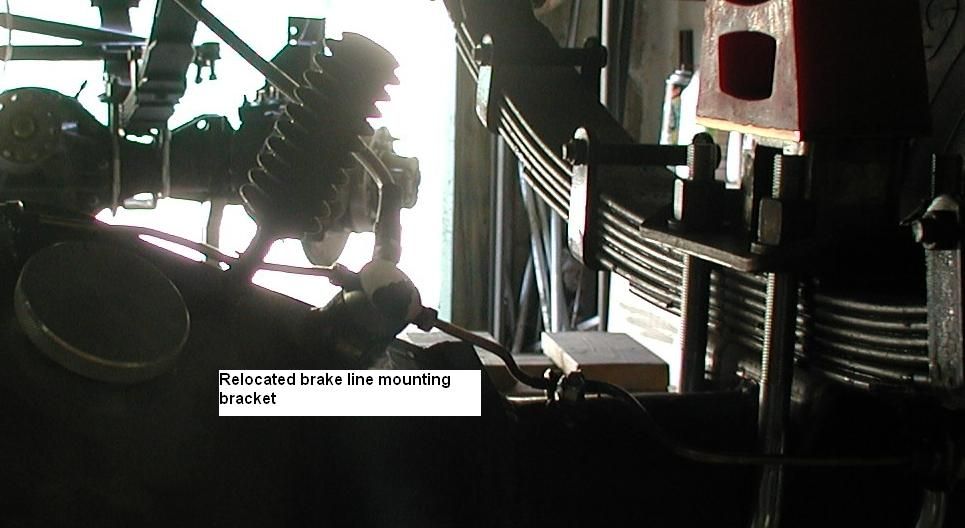
Here is what the new systems looks like and had to be redone since I was going the standard method and already made the mounting. Also had to move the rear axle brake line mount over to clear the new filter.


Image


Image


Image


Image


Image


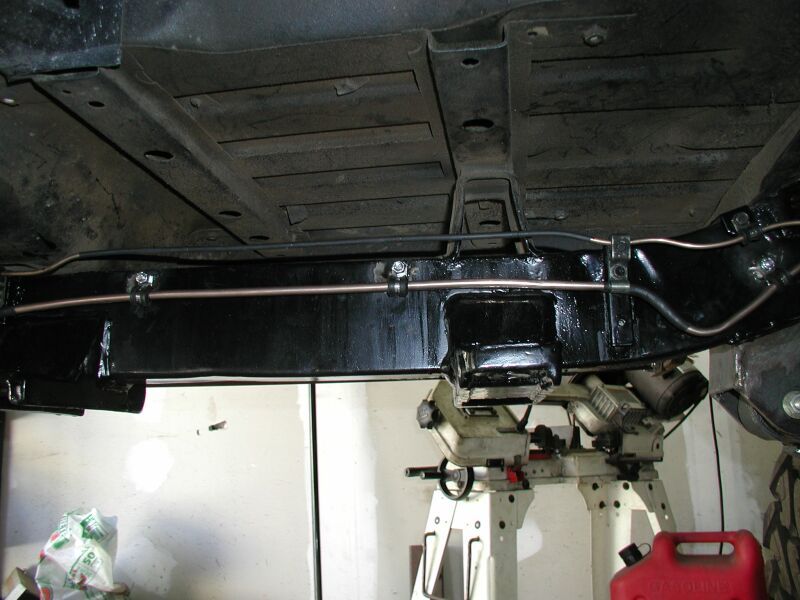
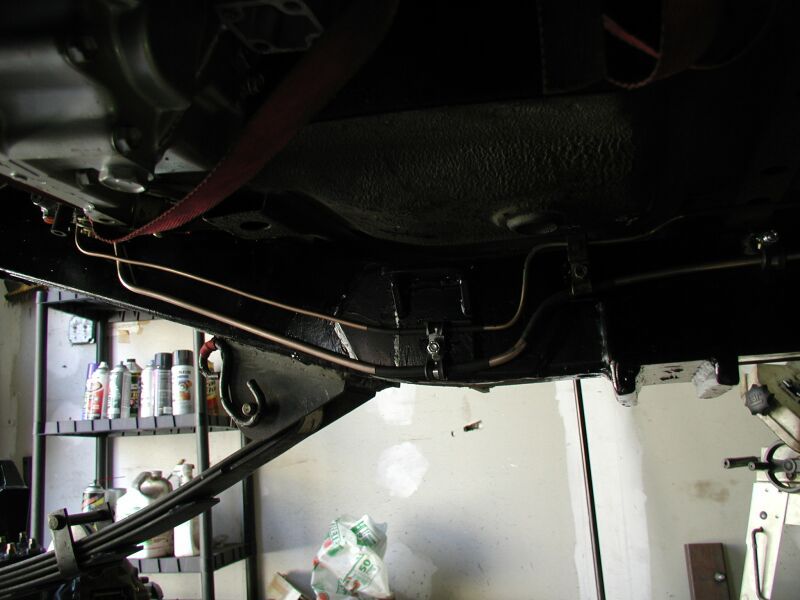
You may have noticed that the frame rails have been stripped and painted with POR15 along with many other parts. Have ti running of the gas tank in the Rig now. Getting there.

User avatar
TanZuk
Engaged 4wd low
Engaged 4wd low
Posts: 234
Joined: Thu Jan 05, 2012 11:17 pm
Location: Pompano Beach, Florida US

Re: Zuk on 38's

Post by TanZuk » Thu Sep 19, 2013 6:57 pm

Reconfiguration of the fuel system.

Do to inconsistent fuel pump pressure ended up moving the fuel pump in front of the fuel water separator. This also moved the fuel pump much closer to the fuel tank which is the better location for the pump.

After rearranging these components the fuel pressure was now consistent (not) running. When the motor was fired up there was still just a little fluctuation in the fuel pressure. Decided to use the anus fuel by pass filter again and discard the restrictor that was being used now to maintain the fuel pump pressure. This stabilized the fuel pressure but needed to open the return line restrictor hole to (.106) to get the desired 1.5 fuel pump pressure for the quad carbs. (These filters are preset for about 3PSI)

I know there are a lot of filters used now, tried it the other way with just 1 filter and was having inconsistent fuel pressure. This is very stable in this configuration and the added filters can’t hurt with the crap gas they are selling now.

Here are a few pics of the new configuration and a fuel distribution block with fuel pressure gauge was added to the fire wall.


Image


Image

Post Reply