Zuk on 38's

Got an vehicle build underway? post up pictures and tell us all how its going!

Builds threads only please.
Post Reply
User avatar
dan_2k_uk
I spend far too much time on here
Posts: 4924
Joined: Tue May 06, 2008 5:19 pm
Location: Swindon, Wiltshire

Re: Zuk on 38's

Post by dan_2k_uk » Sat Feb 25, 2012 10:39 am

TanZuk wrote:
Thanks for answering my question. There are more restrictive states in the US.

Restrictions consisting of:
tire covers as you provided
Bumper Height
Headlight Height

many others just to keep you from enjoying the ride you want. Have to be very careful when going over state lines.
We do have a headlight heigh restriction which I believe to be 1.5m

Im sure there would be plenty of other things. Our mot test is quite strict.

Dan
Image
Janspeed manifold, LWB Vit vented discs and calipers

Build thread -- Build photos -- HLA-Artwork
Coming soon: YJs, Trussed axles, Full float rear.

User avatar
TanZuk
Engaged 4wd low
Engaged 4wd low
Posts: 234
Joined: Thu Jan 05, 2012 11:17 pm
Location: Pompano Beach, Florida US

Re: Zuk on 38's

Post by TanZuk » Sat Feb 25, 2012 3:47 pm

rgonzobull wrote:Definately interest from me and a few others i would say. Very good write up. Makes me look very lazy ha ha. Keep up the build info. Thanks

Really thought that there would have been a few more post for more of the build. As I said in the begining it is about the showing how to approach difficult fab work and build tips not so much on the Big Rig that only a few will like.

Thanks, for taking the time to reply rgonzobull.

I will continue with a bit more of the build and some more tips and see how it goes.

User avatar
TanZuk
Engaged 4wd low
Engaged 4wd low
Posts: 234
Joined: Thu Jan 05, 2012 11:17 pm
Location: Pompano Beach, Florida US

Re: Zuk on 38's

Post by TanZuk » Sat Feb 25, 2012 3:49 pm

Got this PM Question on another one of my build threads and it went like this:

Just wanted to know if you ran into any problems with the offset rear zuki axle from trail gear?

I heard that the axle sits really low in the housing and it rubs?

Also some problems with bolting up the diff? Holes not lining up?
************************************************** ********

I have bought quite a few Trail Gear parts so I’m not going to bash them. That being said I had experienced the holes not lining up on the Diff and Housing.

This is not my fist go around on this type of problem. General you have to tap the studs around a little to get the parts to go together. After spending ½ hour with a loaded diff with 528 gears There was no way they were going together. I decided to buy a diff gasket and see what the problem was. That was a lot easier then messing with the heavy Diff. I found that some of the stud locations were a little off.

I was totally shocked because they both came from Trail Gear. I mentioned that I’m a machinist and when I make a bolt pattern in a matching set of parts. They fall together like one piece.

I decided to give TG a call. I had to go through several people until I got someone that new of the issue. I had to be very persistent on this and it was lucky I had my machining background so there was not much smoke being blown up my ###.

After they acknowledged the issue they were very easy to get along with and wanted me to send the Diff back overnight and they would open the holes up and overnight it back at their cost.

I thought that was very good business on there part. I declined because I had the diff already built like I mentioned. I told them I would just machine the holes myself. I was just happy that I could get then to come clean on the problem. They also said that they were on the problem and would be taking care of it immediately.

Just wanted to say with all the building of Hot Rods, Custom Motorcycles and Off Road Rigs that I have done through out the years. There aren’t too many parts that I have purchased that didn’t need some type of rework. That’s what is known as the fun in the build.. I’m just glad that I have the equipment for those times.

I have no problems continuing purchasing from Trail Gear.

User avatar
TanZuk
Engaged 4wd low
Engaged 4wd low
Posts: 234
Joined: Thu Jan 05, 2012 11:17 pm
Location: Pompano Beach, Florida US

Re: Zuk on 38's

Post by TanZuk » Sat Feb 25, 2012 3:50 pm

I had an 8” drop for my steering. This ended up being a 13 degree drag link angle. The Rig will see mostly street use as you know and that much angle would be way too much.

Here was the solution I came up with.

1” drop FJ80 Steering Box
Box DS Frame Rail 1/4x5x24 Plate top, bottom, both sides
TG Drop Pitman Arm
4” Custom Extended Arm
TG 6 Shooters
Anti-Rotation Deflection Bracket

With these mods I was able to achieve a 5 degree Drag Link and Panhard bar angle. This was now a safe, clean and expectable mod. IMHO

This is a closer view of the Extension and the Anti-Rotation Deflection Bracket and in different views to give a better perspective. I believe that I have got them clearanced so there will not be any interference. I will have to start cycling the suspension just to double check.

The 6 Shooter arm added to the Extension will be Tig welded by a Pro down the street. The welds will be smoothed out on the bottom for the
Anti-Rotation Deflection Bracket mouning surface. This gets bolted in place with a 9/16 Grade 8 bolt on the arm and (2) ½ Grade 8 socket head bolts on the ears. There will be 2 additional 90 degree gussets welded to the bottom side for piece of mind.


I got this done on Friday thought I would share some pics.


Marked View

Image


Front View

Image


Side View

Image

User avatar
TanZuk
Engaged 4wd low
Engaged 4wd low
Posts: 234
Joined: Thu Jan 05, 2012 11:17 pm
Location: Pompano Beach, Florida US

Re: Zuk on 38's

Post by TanZuk » Sat Feb 25, 2012 3:53 pm

Here is some info on the rear 3” extension:

Thought this needed to be added first. It takes quite a while to save money and build your new project as you all know. With the economy being so bad and merchants closing down this is what happened to me.

I was buying parts as a group front end first which included some 4.5 Lift Rear Rubicon YJ’s for the front. I got the front suspension in and was going to order parts for the rear. To my surprise Rubicon was under restructure and no one new if or when they were going to be offering parts again.

That really knocked the wind out of the build until I could get a rear set of springs. After looking at what the aftermarket had to offer the decision was to have a custom set made. They did a good job and got them to me on time. The order was for a pair of 4.5 Lift Springs center pinned. When I went to in stall them they were not the same amount of lift as the fronts. (Just another snag that I will use it as a positive) It will be less stiff in the back know.

It all worked out in the end I just had to make some adjustments in the length of the new rear shackle mounts and some added ¼ plate for structure support.

The pics are marked in detail.

Rear Front Mount Marked

Image


Back Side Rear Front Mount

Image


Inside View Rear Mount

Image


Back View Rear Mount

Image


Outside View Rear Mount

Image

User avatar
TanZuk
Engaged 4wd low
Engaged 4wd low
Posts: 234
Joined: Thu Jan 05, 2012 11:17 pm
Location: Pompano Beach, Florida US

Re: Zuk on 38's

Post by TanZuk » Sat Feb 25, 2012 3:55 pm

I’m going to include this info in this thread.

Scott has also posted it in your DIY section.

This info seems to be very well appreciated on the Zu and ZK and was moved to sticky’s shortly after posting. I hope that you get something out of it as well.

The trans is not talked about too much and being in the process of rebuilding the one going in this build. Thought it would be a good time to share a few tips and tools that were picked up on in a couple of pervious rebuilds.

Reference Rebuild Info:

This is a good step by step and pics
http://www.geerdijk.com/files/suzuki/tranny_rebuild.pdf

The FSM will be needed for a few things that were not covered.


This is my minimum parts list and parts # from LROR.

1----STM-ISR-----------Samurai Transmission Front Input Housing Bearing Retainer
2----STM-CRSB--------Samurai Clutch Release Shaft (throwout) Bushing
1----STM-TNB----------Samurai Transmission Needle Bearings
1----STM-RRTB--------Suzuki Samurai Transmission Tail Shaft Bushing
1----STM-UTM---------Unbreakable Rear Transmission Mount
1----SDT-TBS----------Samurai Transmission Shifter Bolt 86-89
1----STM-TIP-----------Samurai Timing Inspection Plug
1----SDT-TMBN--------Samurai Nylatron Transmission Shifter Bushing
1----STM-RKS----------Samurai Transmission Rebuild Kit w/ Syncros And Silicone
1----STM-CRSOS-----Clutch Release Shaft (Throwout) Oil Seal


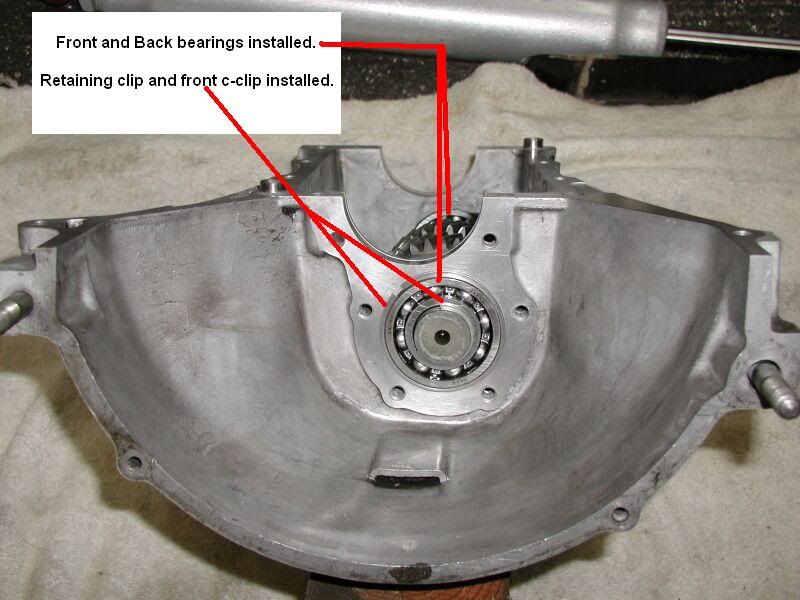
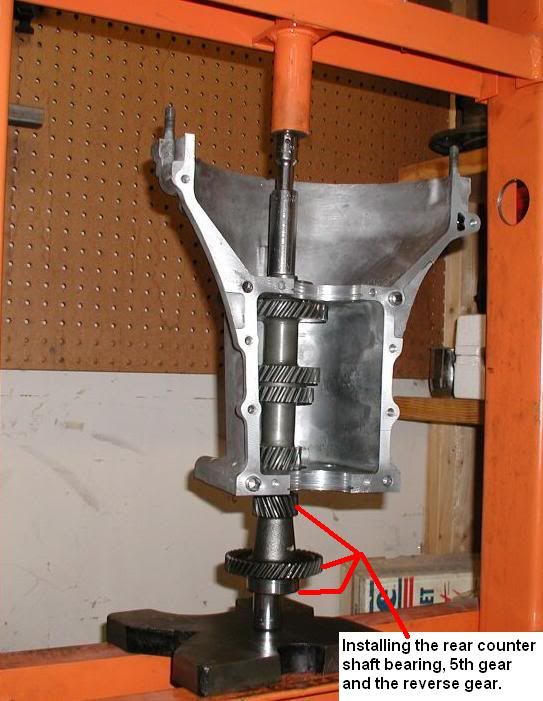
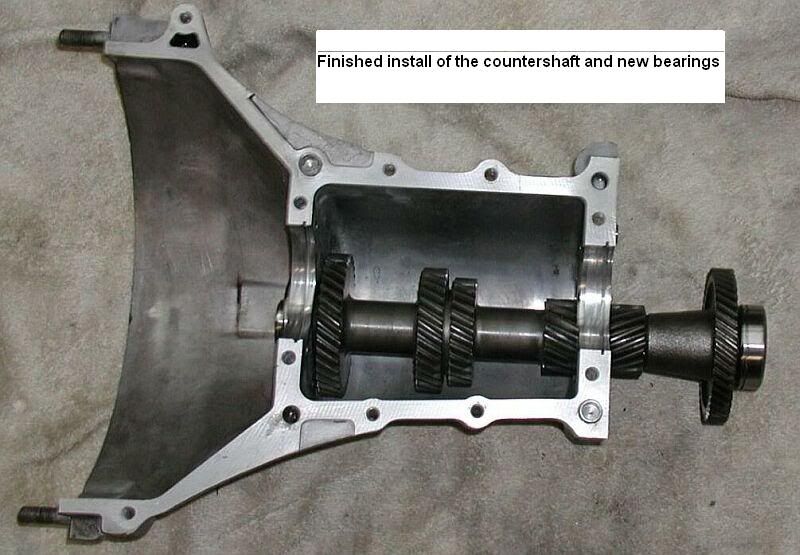
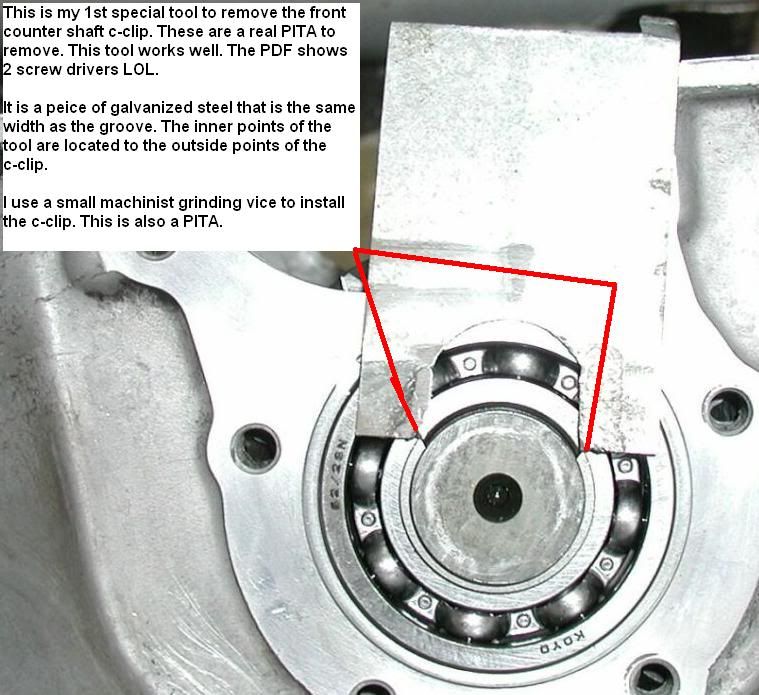
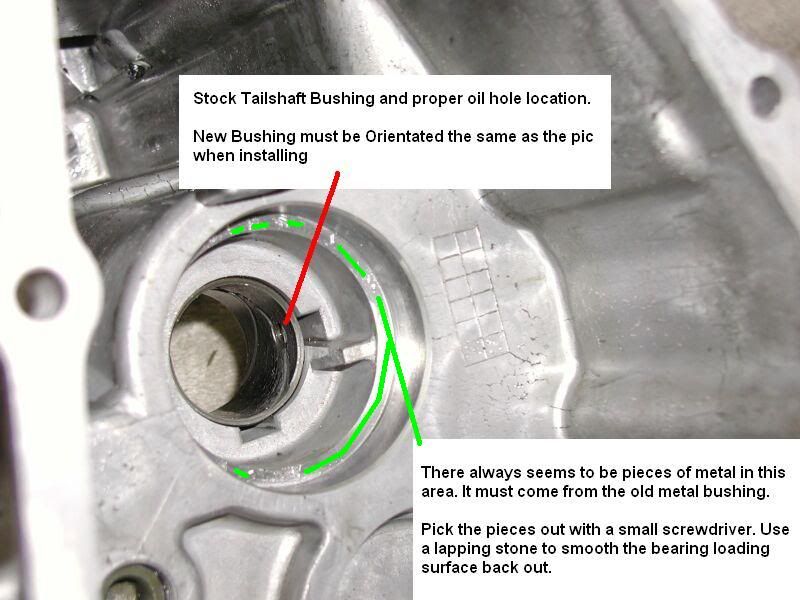
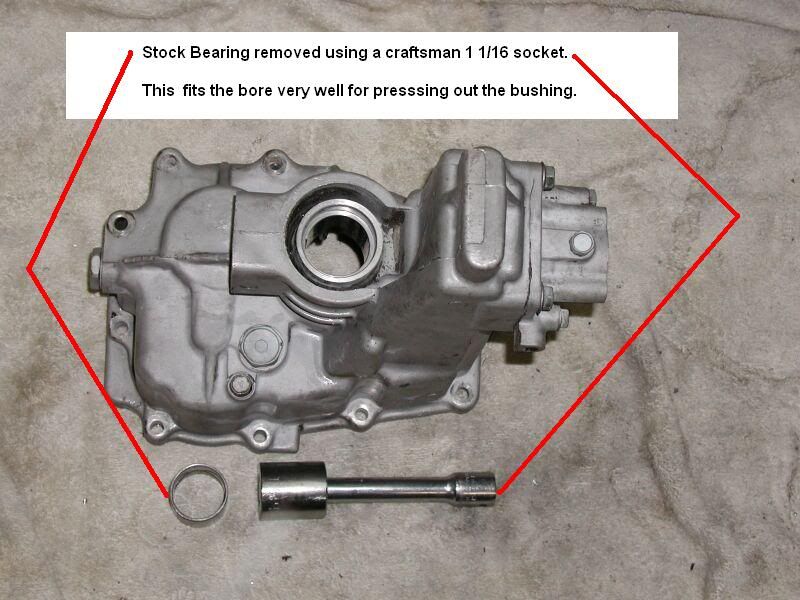
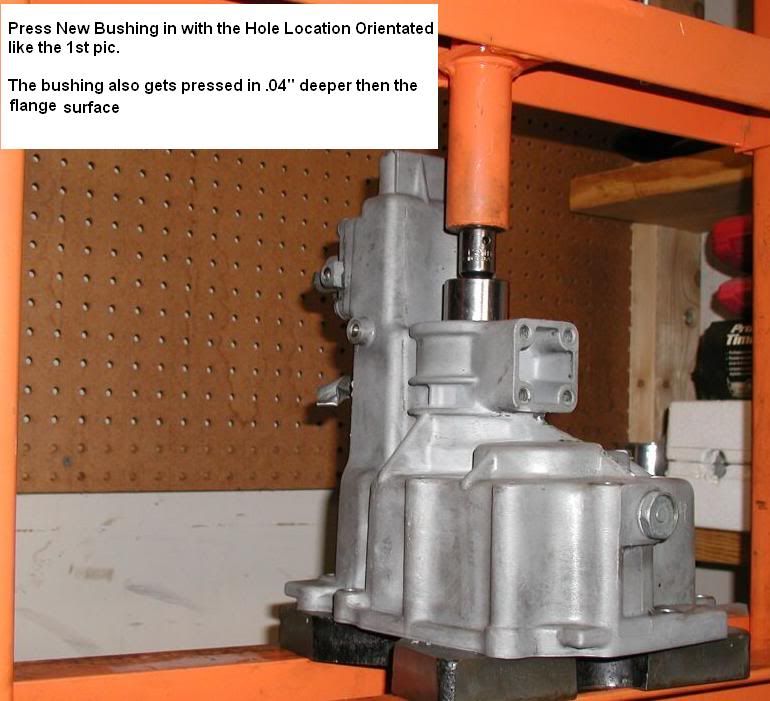
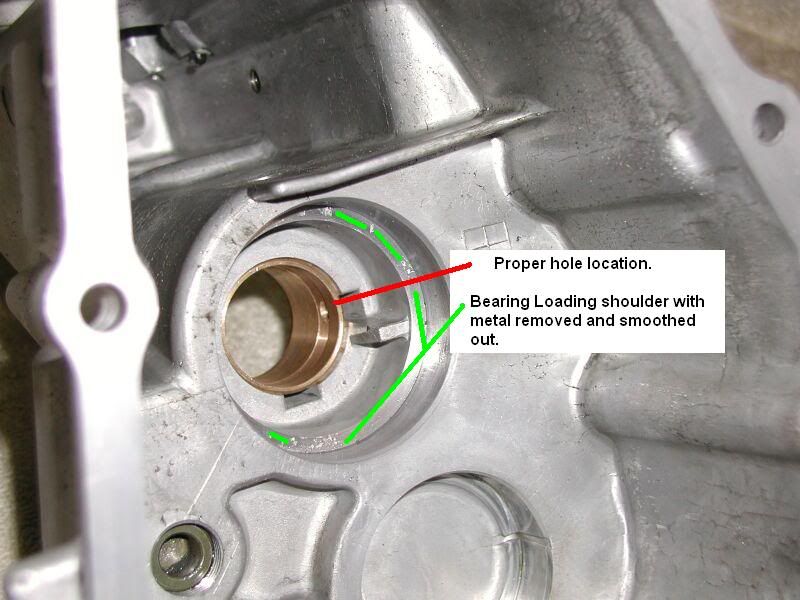
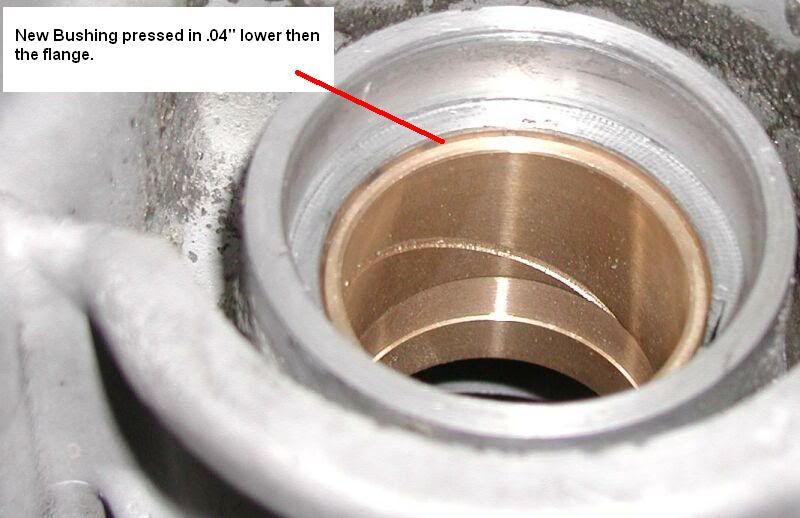
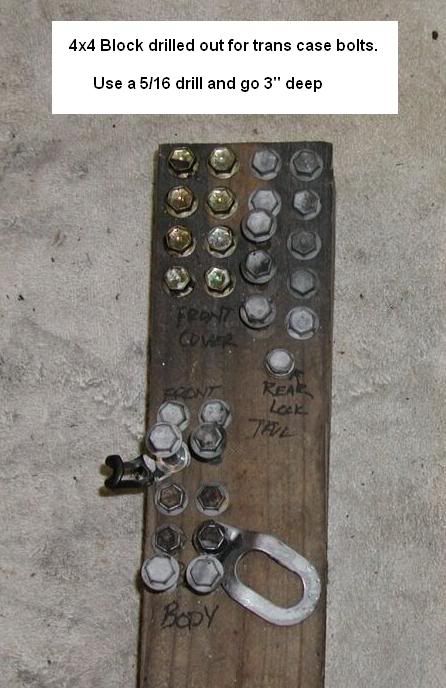
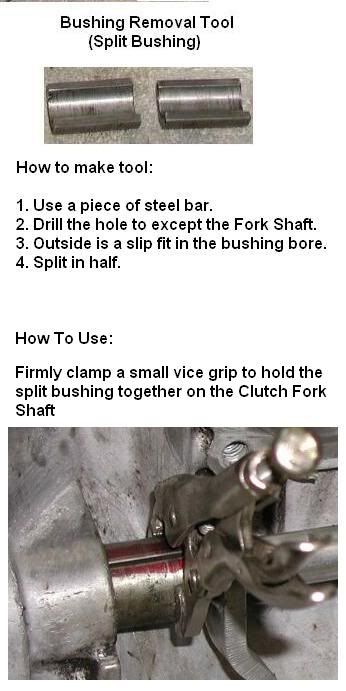
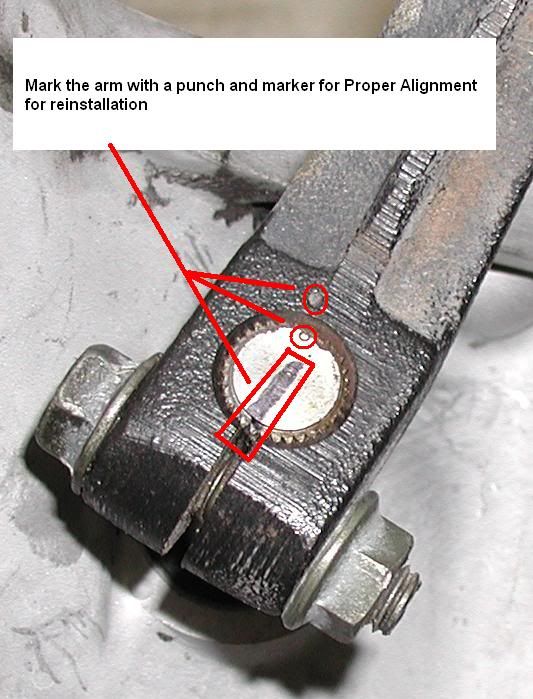
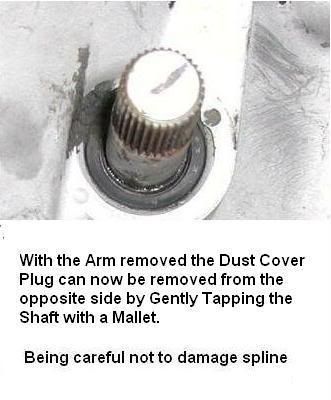
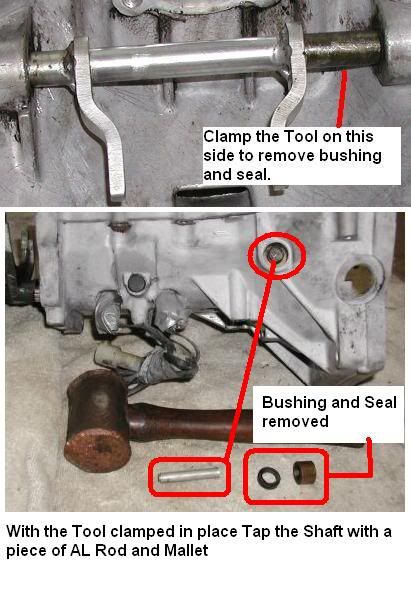
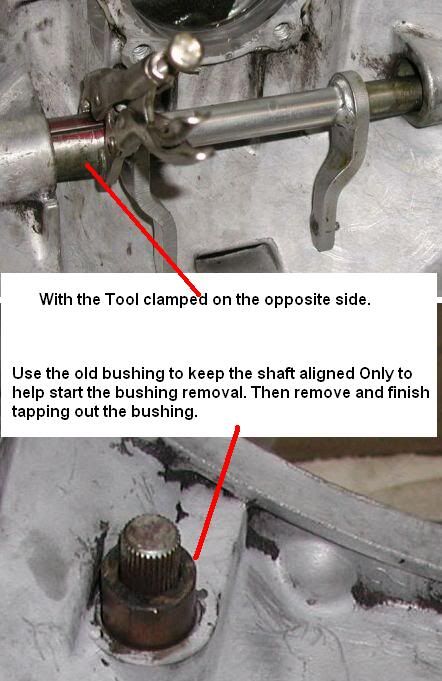
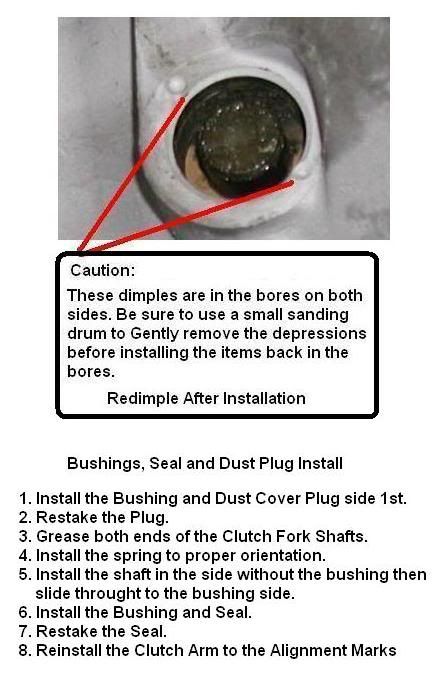
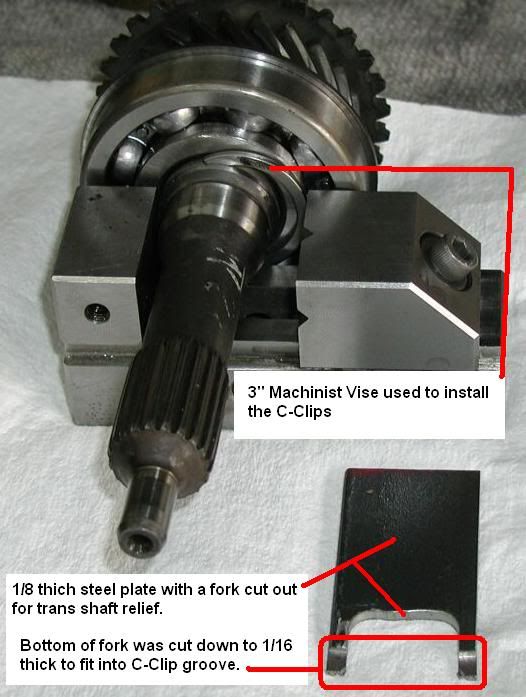
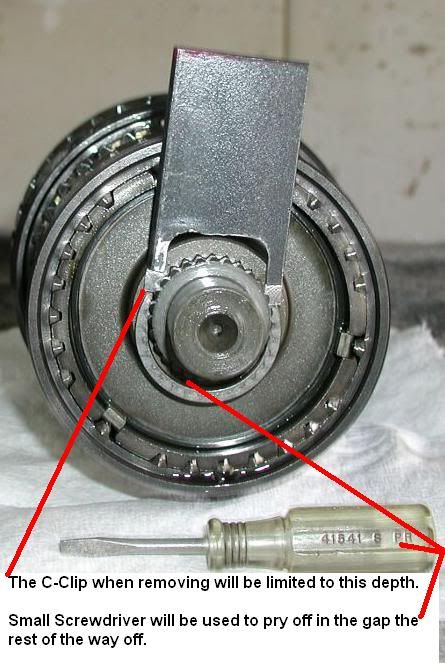
There are a few grey areas I will try and shed some light on.

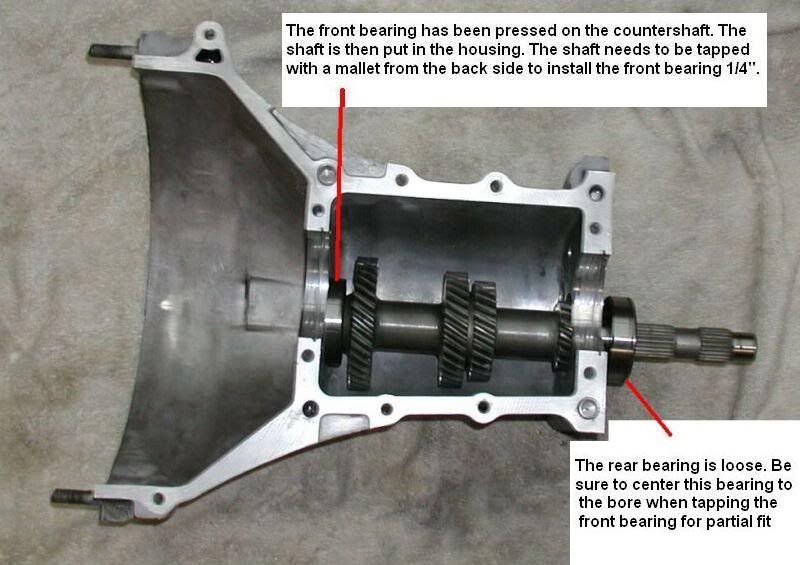
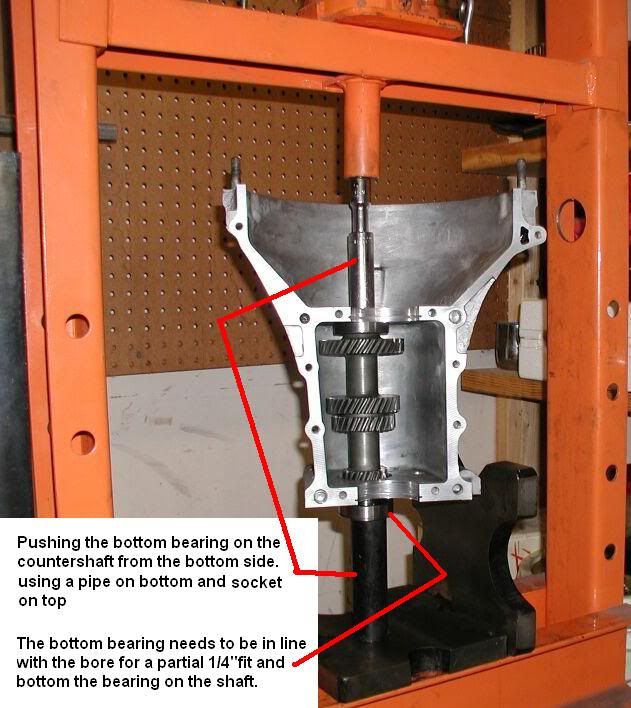
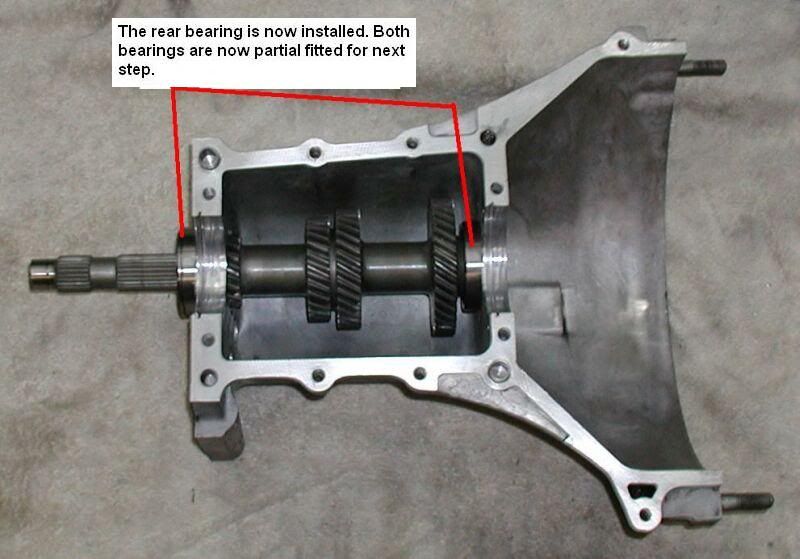
The countershaft installation is one of those grey areas. This is the procedure that works well with a press, mallet, couple of sockets and a piece of pipe.

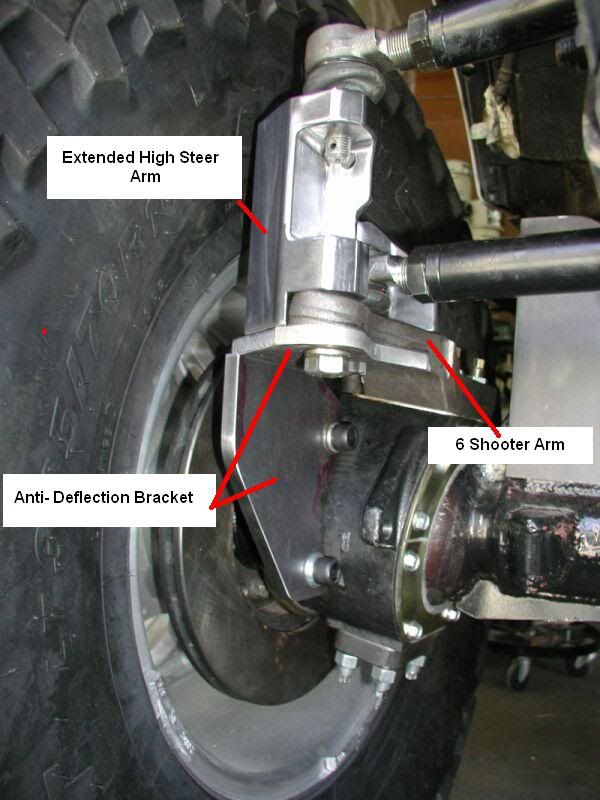
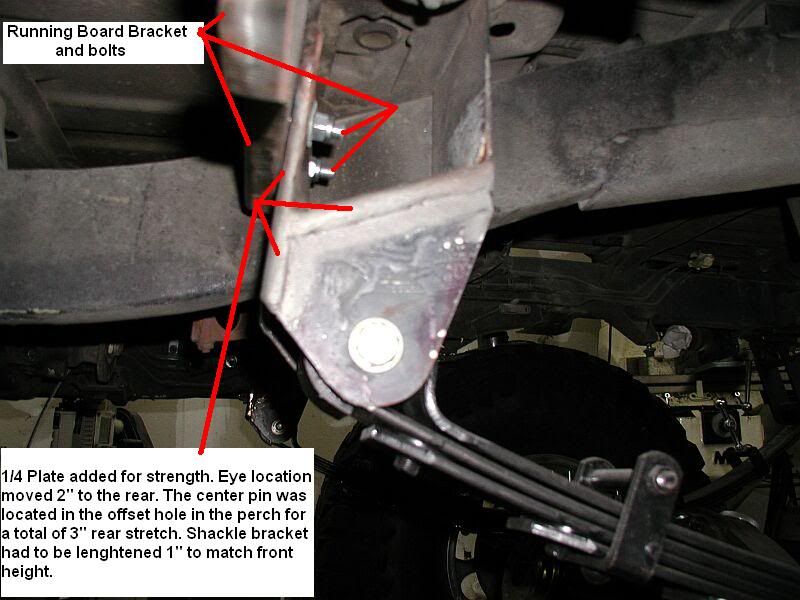
Pics are marked in detail

Image


Image


Image


Image


Image


Image


Image


Image


Image

User avatar
TanZuk
Engaged 4wd low
Engaged 4wd low
Posts: 234
Joined: Thu Jan 05, 2012 11:17 pm
Location: Pompano Beach, Florida US

Re: Zuk on 38's

Post by TanZuk » Sat Feb 25, 2012 4:00 pm

Here is another one of those gray areas that I will walk you through.

Rear Tailshaft Bushing is something that is probably overlooked.

A couple of reason for changing it are:

There always seems to be metal shavings on the rear tialshaft bearing location flange. The worn out bushing seems to be causing this problem.

The worn out bushing will also cause the driveshaft to have excess runout and will cause the seal to leak prematurely.

The pics are marked in order of removal and install.


Image


Image


Image


Image


Image

User avatar
TanZuk
Engaged 4wd low
Engaged 4wd low
Posts: 234
Joined: Thu Jan 05, 2012 11:17 pm
Location: Pompano Beach, Florida US

Re: Zuk on 38's

Post by TanZuk » Sat Feb 25, 2012 4:03 pm

Here is a Tip that has been around for a long time. Never tried it before because of the extra time involved to make it.

The last trans rebuild the case bolts seemed to be a problem keeping sorted for the proper hole locations. This is because there are different lengths and different types of items attached to them. They also tend to roll around on the bench which causes them to get mixed up.

Decided to give the block of wood with holes drilled a try. It is to keep the appropriate bolts in order and location they were removed from. Wanted to pass this on because it had worked so well. The bolts had better manners this time and are going to be very easy now to install.

Definitely worth the extra time to make.

Pic is of a 4x4 Block of scrap wood and 5/16 holes drilled for the bolts 3” deep. The holes were put in to match the bolts in the separate sections of the housing during disassembly.


Image

User avatar
TanZuk
Engaged 4wd low
Engaged 4wd low
Posts: 234
Joined: Thu Jan 05, 2012 11:17 pm
Location: Pompano Beach, Florida US

Re: Zuk on 38's

Post by TanZuk » Sat Feb 25, 2012 4:06 pm

Clutch Fork Bushing removal tool consisting of:

How to make a tool

How to use the tool

Bushing Removal and Install Instructions


The info was getting much too long to make it interesting. It is now in a much shorter format with a lot of detail for completing this task.

Pics are posted in order and marked with instructions.

This tool and process has been used several times. Just hope it isn’t too confusing on the instructional part of it.


Image


Image


Image


Image


Image


Image


Image

User avatar
TanZuk
Engaged 4wd low
Engaged 4wd low
Posts: 234
Joined: Thu Jan 05, 2012 11:17 pm
Location: Pompano Beach, Florida US

Re: Zuk on 38's

Post by TanZuk » Sat Feb 25, 2012 4:09 pm

Found after disassembly the instructions seemed a bit sketchy for reassembly. Thought a more detailed assembly process and the Special Tools would shed some light on the gray areas that I had experienced. Hope these couple of transmission tips were helpful and will be moving back on to fab work again.

Note: (IMO)
The special tools that were used can be made without too much trouble. The Small Vise that was used is a CHEAP 3” Vise that can be found at Enco.

No responce for this to be in the Tech Section so this is where it will stay.

Here are the last 2 tools that were used.


Image


Image

Post Reply