Santana Pickup Build

Got an vehicle build underway? post up pictures and tell us all how its going!

Builds threads only please.
User avatar
rundo
Got muddy boots
Got muddy boots
Posts: 52
Joined: Sun Nov 09, 2014 7:59 pm

Santana Pickup Build

Post by rundo » Wed Jan 21, 2015 8:03 am

Hi everybody,
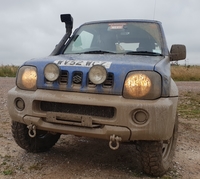
Besides problems descriped in technical forum I would like to introduce my car and things that I would like to add or change to my car. Some of You might want to do the same or give its input to thing I might do wrong... This is not a build thread, rather small changes that I have on my mind. Anyway, here how it looks when I just got it besides being in pretty good shape, lame stickers and ugly wheelcovers (who would put covers on anus), nice fog lights (but wrong shape) and decent radio with not so good sound... It is spanish made Santana with PSA 1.9 Turbo diesel LWB pick up converted to passenger vehicle with plastic hardtop and vitara folding back seats (it was done to avoid cargo registration which is complicated unless You have own company or something). Top sucks... I can hardly wait to take it off in summer :doublethumbs:

Image
Last edited by rundo on Wed Jan 21, 2015 2:15 pm, edited 1 time in total.

User avatar
rundo
Got muddy boots
Got muddy boots
Posts: 52
Joined: Sun Nov 09, 2014 7:59 pm

Re: Santana Puck up Build

Post by rundo » Wed Jan 21, 2015 8:20 am

First to do is to move license plate anywhere else but center. I did that second day also get rid of wheelcovers which revealed factory wheels with damaged paint along outer ring (but no too much rust). Took off stickers too with hair dryer. Engine bay was clean and nice no leaks just notice that some parts are rusted badly and those are heater deflector, servo container and battery tiedown thing.

Image

Will take care of that later but seems that all Santana suffer this guess it is bad material and prep in factory... In this first month or two I concentrate more on mechanical side and service described in transmission section plus changed two blown glow plugs my mechanic said that engine is in great shape... it starts emediately on freezing mornings like -10 or so. Plus vehicle was originally sold in Sweden so it came with DEFA block heater but I have not test it yet (dont have interconnect cable)

Image
Last edited by rundo on Fri Jan 23, 2015 10:17 am, edited 1 time in total.

User avatar
rundo
Got muddy boots
Got muddy boots
Posts: 52
Joined: Sun Nov 09, 2014 7:59 pm

Re: Santana Puck up Build

Post by rundo » Wed Jan 21, 2015 12:27 pm

hahaha now I can see topic title PUCK up... my mistake but I cant change it now
whatever...
Next things to do:
1. New tires
2. 7J wheels (to fit 205) this search take patience to get bargain so I will flat paint what I got
3. Bull bar
4. Round fog lights
5. Mud flaps DIY offcourse
Last edited by rundo on Wed Jan 21, 2015 2:17 pm, edited 1 time in total.

User avatar
rundo
Got muddy boots
Got muddy boots
Posts: 52
Joined: Sun Nov 09, 2014 7:59 pm

Re: Santana Puck up Build

Post by rundo » Wed Jan 21, 2015 12:48 pm

Next thing was to throw out upholstery / carpets that previous owner cut for back side of Samurai which stenk really bad (and was wet all the time, cause hardtop leaks Land Rover style) plus car was pick-up originally I wanted to keep it clean with no rag period just naked bed on the back. For that purpose I ordered rubber plug and gromet set fom Ebay for around 6 bucks and plug every hole in the floor which was plenty (it is left by factory for fixing body panels, belts and stuff). First I came across original Samurai plug set but most of plugs pictured I already have and it was quite pricey so this works well still have some rubber left (picture). Later on, I found out thar rubber is Your best friend with Suzuki to plug, patch and fight its shake, rattle and roll :shock:

Image


While doing this pull out rest of carpeting and front seats too. It was quite clean and rust free just surface spots of rust which I sanded lightly and brush painted with lacquer. More serious rust was around seat rail bolts (and bolts itself) on passenger side which protrudes all the way thru body (picture). Fix that too, install new bolts (wanted to get stainless steel but unable to get right size, order it from Ebay but never got it - stuck somewhere) and soak bolt and threads wit grease.

Image

I was driving like that, just with rubber matts but put back original carpet for right now. It is much easier to clean without carpet and since it is leaking much easier to spot water collection. One thing I have noticed, even without carpet I can smell mildew inside, dont know why and where it comes from... I suspect somewhere inside heat duct but definitely not willing to open it to check. Anyone have any ideas???

User avatar
dan_2k_uk
I spend far too much time on here
Posts: 4924
Joined: Tue May 06, 2008 5:19 pm
Location: Swindon, Wiltshire

Re: Santana Puck up Build

Post by dan_2k_uk » Wed Jan 21, 2015 6:15 pm

Hi. Looks like you are getting on with it.

The water coming in may be from the vent between the windscreen and bonnet being blocked. There are two 90° rubber bends that point downwards in the engine bay to drain water from it. Check they are clear and hose out the vent and check water comes out of them.

I will change your title to pickup for you.
Image
Janspeed manifold, LWB Vit vented discs and calipers

Build thread -- Build photos -- HLA-Artwork
Coming soon: YJs, Trussed axles, Full float rear.

User avatar
rundo
Got muddy boots
Got muddy boots
Posts: 52
Joined: Sun Nov 09, 2014 7:59 pm

Re: Santana Pickup Build

Post by rundo » Wed Jan 21, 2015 8:42 pm

Thanx for title,
I will check drains... it realy stinks sometimes like three wet dogs inside

User avatar
rundo
Got muddy boots
Got muddy boots
Posts: 52
Joined: Sun Nov 09, 2014 7:59 pm

Re: Santana Pickup Build

Post by rundo » Fri Jan 23, 2015 10:46 am

Drains OK... must be seats, I will take it to chemical cleaning anyway. Here is what I have done next...
Fog lights, those square are so square and sad, I mean they work great but just dont look well on Samurai (gonna keep them for back as backup lights and guys with high beams behind me).

Image

Image

I search internet and found some Bosch 160mm new for around 25 Euros.

Image

Being same brand, new lights slide in same place without even changing the bracket. It is pretty size lamp but after installation I can see that I need bigger fog lights as far as look is concern. It is more intended for installation on passenger car, so I will probably pass it to my mate just rebuilding 1977 Mini. Performance is great having H4 bulbs inside though. Square lamps were connected to high beams which is (i believe) against the law in my country because police make no difference between driving lights and fog lights. So I have it hooked together with rear fog lights on same switch. This is how front look with license plate moved aside and new fog lights:

Image

Sorry for shaded license I am not paranoic just think its safer this way. I also strap tarpaulin at my backyard to keep rain off the vehicle cause it leaks pretty bad from everywhere, for one rainy day I could collect one liter of water for sure :|
Around new year it was cold and snowy so project was on ice and money is gone for wood an coal. Meanwhile, got Sony radio with AUX from my mate and replaced factory speaker wires with thick ones, still sound lacks clarity so I guess I will have to spare a pair of good speakers.
Last edited by rundo on Fri Jan 23, 2015 10:01 pm, edited 9 times in total.

User avatar
rundo
Got muddy boots
Got muddy boots
Posts: 52
Joined: Sun Nov 09, 2014 7:59 pm

Re: Santana Pickup Build

Post by rundo » Fri Jan 23, 2015 10:52 am

Second weekend in New year got my wheels painted. My whole idea is to keep it spartan simple, military/agricultural stance to anus so I choose flat black, maybe with military style wheel rings (that is another idea – later) At first I wanted to have it sanded to bare metal but dont have spare set and these are not that bad so I decided just to prep and paint face side without taking tire off for right now. Got a can of regular flat black laying around garage - it will be perfect.

Image

Did all job for few hours at my friends garage. This is him at work without cigarette... and this is final product of job with heavy hangover.

Image
Image
Last edited by rundo on Tue Apr 21, 2015 2:43 pm, edited 1 time in total.

User avatar
rundo
Got muddy boots
Got muddy boots
Posts: 52
Joined: Sun Nov 09, 2014 7:59 pm

Re: Santana Pickup Build

Post by rundo » Fri Jan 23, 2015 11:01 am

This is just what I wanted, he add some pearl to paint so it is just perfect anthracite matte with metallic gloss. However, locking hubs are so ugly and rusted now I have to figure out how to take it off without losing its innards. I noticed that it is different than regular locking hubs on Suzuki without top piece with 6 nuts? It says Made in USA on it? My idea is to polish it because whatever You paint it will come off soon or later especially from aluminium.

User avatar
zook123
SCUK Addict
SCUK Addict
Posts: 948
Joined: Sun Apr 20, 2008 10:48 pm
Location: Shepton Mallet

Re: Santana Pickup Build

Post by zook123 » Fri Jan 23, 2015 11:27 am

Surprised nobody else has posted a reply. Plans sound good! Quite like the front end on this, very different to the ones in the UK!
Image
2002 Jimny O2 Ragtop
Safari Snorkel, Freewheeling Hub Conversion
Diff Breathers, G/Box and T/Box Breathers, 2in Suspension Lift
HD Recovery Points and Winch Plate
Kuhmo KL71 MT / Goodyear Wrangler AT


Wessex 4X4 Reponse - WE411
wessex4x4response.org.uk

Post Reply